Framer JS Page Components Tutorial & How-To For Beginners

When Steve Jobs announced the iPhone in 2007 he wowed the crowd demoing scrolling. A simple gesture that felt magical back then. There is actually lots of physics and code behind scrolling and not so much magic. Today we take scrolling and swiping effects for granted. Like swiping left or right between screens to view more information.
READ: Framer JS Tutorial And Examples For Beginners
Framer JS Page Components
Framer JS supports paginated swipes and swiping with the PageComponent. According to the documentation:
“The PageComponent is based on the ScrollComponent, but designed for displaying paginated instead of continuous content. It supports content layers of different sizes, and can snap to layers based on location and scroll velocity”.
Think of your iPhone home screen. You swipe left to jump to a new screen on the right. You swipe right to go back to the first screen.
Framer JS Page Components Basics
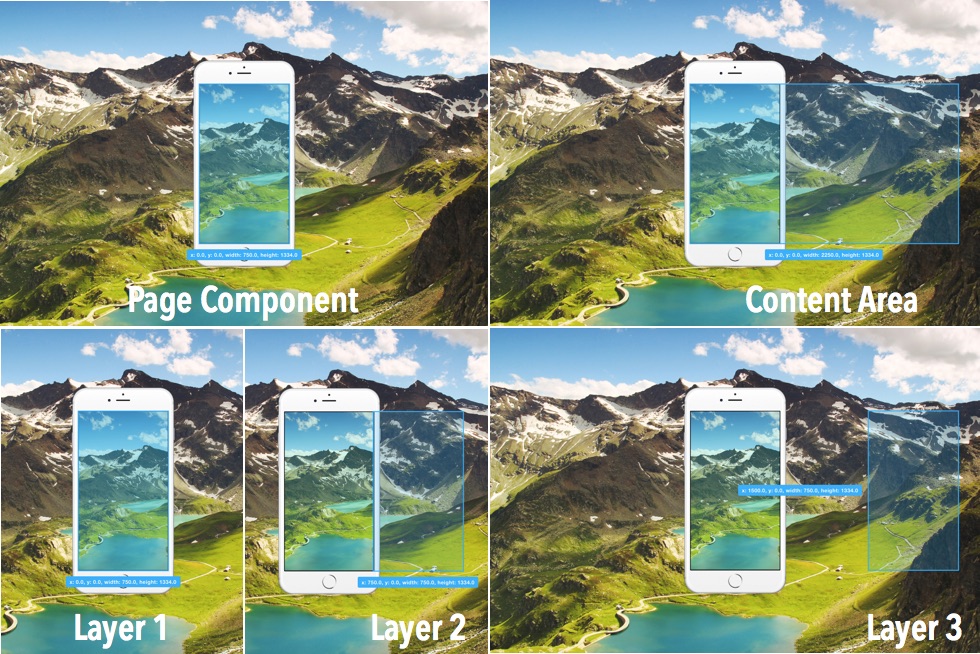
There are 3 things to know about the PageComponent.
- The PageComponent
- The Content Area
- The Content Itself
The PageComponent initiates the process in Framer JS. It defines the touch area for swipes .
The content area is the area where the content exists. Every screen belongs here. Only a part of the content area is visible at a given time. One screen every swipe.
The content is the layers within the content area. This can be anything. A simple Framer JS layer, images, videos, HTML you name it.
Here’s how it looks when you put everything together.
There are two ways to create a PageComponent in Framer JS. Defining each layer separately or using a For loop. Let’s start with the For loop.
Framer JS Page Components Example – For Loop
First we create and define the page component properties. It covers the whole screen. The scrollVertical disables swipes up or down.
[syntax type=”js”]
Page = new PageComponent
width: Screen.width, height: Screen.height, scrollVertical: false
[/syntax]
Adding a background layer to make things more interesting.
[syntax type=”js”]
bg = new BackgroundLayer
width: 808, height: 1134
image: “images/mountainbg.png”
[/syntax]
This is where the real magic happens. A For loop creates the content. 8 layers with the same properties. This content belongs and “lives” inside the Page component. This is defined by the superLayer variable. Each of the 8 layers gets a random color with opacity 0.2.
[syntax type=”js”]
for i in [0..7]
Filters = new Layer
width: Screen.width
height: Screen.height
x: Screen.width * i
superLayer: Page.content
backgroundColor: Utils.randomColor(0.2)
[/syntax]
The i is a variable. You can name it whatever you want. The number of the layers counts 0 as the first layer. 1 is the second layer and so on. The width and height of each layer equals the iPhone’s width and height. Which equals the width and height of the Page Component. This means that swipes work on full screen, not on a specific area.
Each layer x coordinate changes with the loop. First layer’s x equals 0. Second layer’s x equals 750 ( 750 * 1). Third layer’s x equals 1500 ( 750 * 2 ) etc.
In a nutshell here’s what happened.
- A new Page Component was created that covers the full screen
- A layer with an image was added to make things look beautiful
- A For loop is used to create 8 layers, tell Framer JS that they belong inside the Page Component and assign them random colors
- A new Page Component was created that covers the full screen
- A layer with an image was added to make things look beautiful
- Three layers were created. Two simple Framer JS layers and one image layer. Each layer belongs inside the Page Component and placed on the right of the first layer.
You can see the Snapchat like prototype with color filters and for loop here.
Framer JS Page Components Example – Manual Pages
Adding each layer manually provides more control and freedom. The downside is a bit more code and complexity. I will use the same Snapchat like app example. This time three filters will be created. 2 color filters and 1 color and time filter.
Again the first steps are the same. A Page Component is created and defined. A new background image is added to make things beautiful.
[syntax type=”js”]
Page = new PageComponent
width: Screen.width, height: Screen.height, scrollVertical: false
bg = new BackgroundLayer
width: 808, height: 1134
image: “images/mountainbg.png”
[/syntax]
Now it’s time to create the three layers and connect them with the Page Component.
The first layer is named Filter1. Its width and height is the iPhone’s screen width and height. Background color and opacity are defined. Then the layer is assigned where to “live” using the superLayer variable. That is inside the Page Component.
[syntax type=”js”]
Filter1 = new Layer
width: Screen.width, height: Screen.height, backgroundColor: “#50E3C2″, opacity: 0.2
superLayer: Page.content
[/syntax]
The same goes for the second layer named Filter2. Same properties except for the backgroundColor.
The third layer is a little different. This is an image layer created in Sketch. It’s a .PNG file with opacity 0.2. That’s it.
[syntax type=”js”]
Filter3 = new Layer
width: Screen.width, height: Screen.height, image: “images/SnapTime.png”
superLayer: Page.content
[/syntax]
Now it’s time to tell Framer JS where to place the content and in which order. That is inside the Page Component and on the right of the first layer.
The Filter2 layer will be placed on the right of the Filter1 layer. The Filter3 layer will be placed on the right of the Filter2 layer.
[syntax type=”js”]
Page.addPage(Filter2, “right”)
Page.addPage(Filter3, “right”)
[/syntax]
In a nutshell here’s what happened.
Notice that when adding a new layer that way you can only use right or bottom for the placement of the layers. No left.
You can see the Snapchat like prototype with 2 color filters and time filter here.