Framer JS Basics, Tutorial And Examples For Beginners
I’m not a developer. I’m a maker. I don’t code. I built stuff. I love making things happen and learn through the process.
I decided that learning how to code will help me get smarter [1] and express my creative side. After 3 fairly popular apps [2] Framer JS seemed the perfect fit.
The first time i learned about Framer JS was through this video.
https://www.youtube.com/watch?v=mqk9Fw8FKLY
The problem, for now, with Framer JS is that there are not enough good resources out there. It’s just pieces here and there. Even the Udemy course i paid for was missing stuff.
Framer JS Tutorial. Use Framer Studio To Turn Ideas Into Prototypes
What follows is the kind of information i was hoping to find when i first heard about Framer JS. If you are not a developer this is for you. If you are a creative prepare to wet your pants.
Framer is a prototyping tool based on CoffeeScript.
What that means is that you can go from idea to a working prototype very fast. All you need is mockup pics and some CoffeeScript code. No need for hiring a developer. With Framer JS you can create interactive mockups that act like a real app.
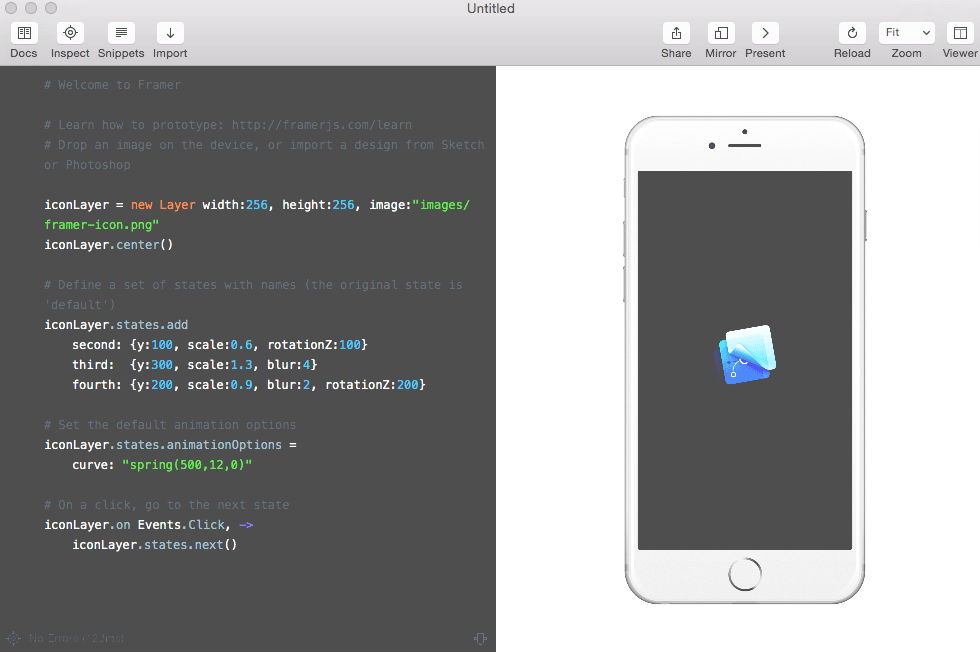
This is how Framer works. You write CoffeeScript on the left pane. You see a real-time preview on the right pane. That’s it. If your code contains errors, an arrow will point the error in your code. A message will also appear at the bottom of the left pane.
Using Framer JS to create prototypes has pros and cons. The main advantage is that you have complete control during the process. You can create anything you want. The limit is your imagination.
This kind of power comes with a price. There is an entry barrier to Framer. It’s called CoffeeScript. Think of CoffeeScript as an easier to understand and maintain JavaScript. That’s all it is.
To start with Framer you need to download Framer Studio. The app is free and fully functional for 15 days.
[cta id=”1557″]
To test and show off your designs on a real device download Frameless. A full screen web browser that automatically connects to Framer Studio and turns your ideas to working apps.
Framer Shortcuts For Beginners
Before you get started, there are a few Framer shortcuts to learn and use.
- Command + S = Save File
- Command + R = Reload Preview
- Command + D = Show Documentation
- Command + / = Comment Selection
Framer JS Basics And An Example

Framer works with layers. Anything can be a layer and treated like one. Text, Images, Videos and Shapes.
Each layer has as set of properties such as position, height, width, opacity etc. Let’s put that in perspective.
Imagine you just finished shopping from IKEA. You had an idea about changing your home office and you just bought a new desk. You are back home and already unpacking while reading the assembly instructions. You put everything together and place the new desk in the room.
When working with Framer the same principles apply. The idea is your prototype. The room is your smartphone. Instead of unpacking you create new layers. You follow Framer JS syntax which is like reading the assembly instructions. When you are done you tell Framer Studio where to place the new layers. Like you’d do with the new furniture.
Now imagine you have many objects or layers. A table and a laptop, a notebook, a pencil and a cup of coffee. Each layer has a place in space (and time). For example your laptop sits on your desk.
Framer Studio knows the position of each layer. Which layer sits on top and which layer is hidden behind another layer. The order you create layers in Framer Studio matters. The last layer you create is the layer on top of all others. Here’s an example:
[syntax type=”js”]
Table = new Layer width: 600, height: 800, backgroundColor:”red”
Notebook = new Layer width: 400, height: 600, backgroundColor:”white”
Pencil = new Layer width: 200, height: 400, backgroundColor:”black”
Table.center()
Notebook.center()
Pencil.center()
[/syntax]
Table is the bottom layer, Notebook is the middle layer and Pencil sits on top of both. All layers are aligned in the middle of the screen.
ButtonOK.center() tells Framer JS to place the layer in the center of the screen.
Tip: Copy and Paste the code in Framer Studio left pane to see it in action in real-time
If Pencil was bigger in size, eg width: 640, height: 840 then Table and Notebook would be covered by Pencil.
[syntax type=”js”]
Table = new Layer width: 600, height: 800, backgroundColor:”red”
Notebook = new Layer width: 400, height: 600, backgroundColor:”white”
Pencil = new Layer width: 640, height: 840, backgroundColor:”black”
Table.center()
Notebook.center()
Pencil.center()
[/syntax]
You may ask why is this important. The answer is layers animation and movement.
Each layer can move in space and time and followed by other layers. For example, imagine you take a sip of your freshly brewed coffee. That’s a layer animation.
Now imagine that while drinking coffee you move the notebook in front of you. That’s two animations happening at the same time. You decide when to move the notebook. It can be at the same time you picked the cup. Or right after you sipped coffee.
Let’s add another layer in the mix. Pencil. If Pencil was bigger in size than Notebook, any animation assigned to Notebook would be invisible. That’s because Notebook would be covered by Pencil. Remember Pencil was the last layer created. In Framer Studio that means that Pencil is the top layer, sitting on top of all other layers.
In Framer Studio each movement is designed, described and implemented with animations. Each animation is triggered by Events like clicks, taps, other animations etc.
Animation is the core of interactive design. It’s the reason you are reading this post.
Create A New Layer In Framer Studio Using An Image
[syntax type=”js”]
ButtonNo = new Layer x:320, y:640, width: 300, height: 100, backgroundColor:”red”
Download = new Layer width: 200, height: 68, image:”images/download.png”
Download.center()
[/syntax]
ButtonNo is layer name for a button. The name can be anything your want. X and y tell Framer where to place the layer based on the top left corner of the screen. Width and height tell Framer Studio the width and height of the new layer.
Download is another layer name for a download button. Width and height are the width and height of the layer. The difference between the Download layer and ButtonNo is that Download layer contains an image. Get the image here.
Download.center() tells Framer JS to place the layer in the center of the screen.
Tip: Drag & Drop any image in Framer Studio. Framer will create the new image layer code for you
Change Layers With Properties In Framer JS
There many ways you can manipulate a layer. You can adjust the layer’s appearance, shape, opacity and more. Some examples:
[syntax type=”js”]
Download = new Layer width: 200, height: 68, image:”images/download.png”, opacity: 0.8
Download.scale = 1.5
Download.sepia = 80
Download.blur = 8
Download.center()
[/syntax]
Learn all about layers here or by hitting Command + D in Framer.
Move Stuff With Draggable Layers In Framer
The easier way to interact with a layer is to make the layer draggable. In Framer Studio all layers are by default not draggable. Thus you have to enable the draggable property.
[syntax type=”js”]
Square = new Layer width: 320, height: 320, backgroundColor:”green”
Square.center()
Square.draggable.enabled = true
[/syntax]
Now click on the green square and move it around. You will notice that the Square layer moves vertically and horizontally. That’s because Framer by default makes a layer draggable to any direction. Framer needs to know explicitly which movement to enable or disable.
To have the Square layer dragged only vertically, you need to disable horizontal movement. Here’s how to do it.
[syntax type=”js”]
Square = new Layer width: 180, height: 180, backgroundColor:”green”
Square.center()
Square.draggable.enabled = true
Square.draggable.horizontal = false
[/syntax]
Framer creates a new layer, aligns it in the center of the screen and makes it draggable. Then it disables horizontal movement. The green square moves (when dragged) only vertically, up or down.
Clicks And Animations For Real World Interactions In Framer JS
[syntax type=”js”]
Download = new Layer width: 200, height: 68, image:”images/download.png”
Download.center()
Download.states.add
Scale: {scale:2}
Blur: {blur:6}
Download.states.animationOptions =
curve: “spring”
Download.on Events.Click, ->
Download.states.next()
[/syntax]
There is a new layer called Download. This is an image layer automatically created by dragging the donwload.png file in Framer Studio window. Framer places the new layer in the center of the screen.
In order to create an interaction Framer needs to know what to do and when to do it. This is where States comes in.
States allow you to define different appearance options for a layer. A layer can have multiple states, each with a different set of properties. States can then be cycled. Each layer’s first state is how the layer originally looks!
In this example you added a new state to the Download layer
Download.states.add
Then you tell Framer the name of each state and its properties. In the example above you created two states. Named Scale and Blur. States names can be anything. Scale and Blur are used to make the code more readable.
Each State has its own set of properties. This is where you tell Framer JS what to do and how to change the appearance of the layer. The first State is named Scale and it will increase the size of the Download layer. The second State is named Blur and it will blur the Download layer.
Download.states.animationOptions
Now that Framer knows how to change the appearance of the layer you define an animation. The layer will change using a spring animation.
Download.on Events.Click, ->
The last bit of code tells Framer when everything happens. Framer JS will cycle through States and use the animation when the Download layer is clicked.
When you click the Download button it will first double in size. Then it will get blurry. It will all happen with a beautiful bouncy animation. Clicking again will make the layer return to its first State. That is how the layer originally looked.
Download.states.next()
The last line of code tells Framer to cycle through the available States of the Download layer. This is why every click on the Download button makes the button bigger, blurry and return to its normal looks.
How To Write Code In Framer JS Studio
CoffeeScript and Framer Studio use white space and indentation in code. Did you notice that the State names (Scale and Blur) were “pushed” a bit on the right? You do that by hitting Tab.
[syntax type=”js”]
Download.states.add
Scale: {scale:2}
Blur: {blur:6}
[/syntax]
Framer Studio will not compile the code if you don’t use proper indentation. Errors will appear. If something is not working double check indentation.
That’s it for now. Enjoy Framer Studio. Express yourself. Build stuff with Framer JS.
[1] Brain Plasticity
[2] Analytiks app, Veedeo app, AdSenseZen (depricated) total almost 500K downloads